All the links and files that support this book are organized below by chapter. You’ll find CAD files for laser cutting and 3D printing, pictures, and video clips of each of the projects. In general, if you search for dustynrobots just about anywhere (flickr, thingiverse, Ponoko, etc.) you’ll find me and links to these files.
Chapter 1- Introduction to Mechanisms and Machines
This chapter covers the 6 basic machines (levers, pulleys, wheel and axle, inclined plane and wedge, screw, gear) and covers a lot of the vocabulary you’ll need in the coming chapters. It also covers minimum constraint design and provides a framework for referencing moving parts (xyz coordinate systems, planes of motion, etc.). You can download the full chapter through this link.
Project 1-1: Rube Goldberg machineTo make the Rube Goldberg machine just like the example, you can download the laser cutter template for free here on Thingiverse or go right to my Ponoko store to buy the parts.
Rube Goldberg Breakfast Machine from Dustyn Roberts on Vimeo.
Also check out this example from a reader!
Chapter 2 – Materials: How to Choose Them and Where to Find Them
In this chapter I cover 6 basic classes of materials: metals, plastics, ceramics, biomaterials, composites, and semiconductors. You’ll also learn where to find them and how to choose them, and a lot of vocabulary associated with material types (what is an alloy metal anyway?). I’ll cover just enough material properties theory to help you choose materials based on yield strength, friction, and more. We’ll also discuss tolerances for part dimensions, and why you should pay attention to them.
Helpful Links:
80/20 Inc. – The Industrial Erector Set
Smooth-On: liquid rubbers and plastics for molding
Project 2-1: Different Diving Boards
In this project you’ll use clay blocks as weights to demonstrate how different materials at the same length behave when one side is clamped to the table and the other is free to bend.
Chapter 3 – Screw It or Glue It: Fastening and Joining Parts
Probably 90% of a moving mechanism doesn’t actually move. What? Well think about it – most moving things, let’s say a blender, have a small moving part and a lot of structural support around it. This chapter will cover fastening and joining techniques to help make the structures of your moving parts sound and sturdy. We’ll focus mostly on construction techniques and non-permanent joints (screws, pins) vs. permanent joints (welds, rivets) because they’re easier to prototype with and don’t require special equipment.
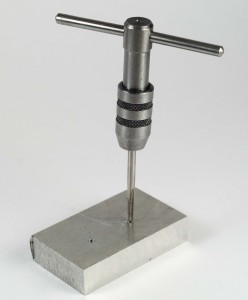
Project 3-1: How to drill and tap a hole
Chapter 4 – Forces, Friction, and Torque (Oh My)
In this chapter we’ll look at static (unmoving) forces and figure out what torque and friction really mean. Why study statics in a book about things that move? 1) A static problem (one that is balanced and unmoving) can be a snapshot of a dynamic (moving) problem, and 2) most of the time we can isolate a statics problem that represents the worst case of a dynamic one (i.e. when the weight is farthest from the motor shaft and hardest to turn). I’ll cover essential tools to predict forces and torques, go over vocabulary and define units (what the heck is a gram-centimeter?) that will help you choose components. Time will be spent describing what friction is, then describing ways to get rid of it. From WD-40 to proper clearances, this is one of the handiest reference sections for DIY mechanism troubleshooting.
Project 4-1: Slip and Slide

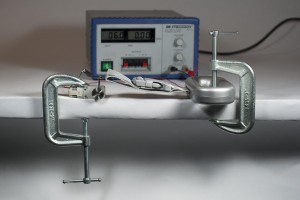
Project 4-2: Measuring Motor Torque
Chapter 5 – Mechanical and Electrical Power, Work, and Energy
All things that move need some source of energy. This energy may be as simple as using gravity (like how a slinky can walk down stairs), or as complex as an internal combustion engine. Power can also be supplied by a person, by cranking a handle or pedaling a bike. Our bodies turn the chemical energy from food we eat into mechanical energy so we can run and jump. Motors turn electrical energy into mechanical energy so we can make things that move and spin. In this chapter we’ll discuss how power, work, and energy are related, identify sources of power, then highlight practical examples of putting these sources to work.
Correction: On page 101 of the paperback version, it says that alternating current fluctuates between 0V and 120V. It actually fluctuates from about 169 V below ground to 169 V above ground. It supplies the same average power as a 120 V DC source, which is why it is called 120 V AC. — Thanks to William E. Wagner III’s comment on Amazon!
Project 5-1: Mousetrap powered car
See my Mousetrap Powered Car Instructable for full documentation! You can download the wheels template (or a hub for a CD wheel) for free on Thingiverse or order the parts directly from Ponoko.
Chapter 6 – Eeny, Meeny, Miny, Motor: Creating and Controlling Motion
This chapter covers the different kinds of motors and how to choose between them. Once you know what power and torque are and how to estimate what you need for a certain project, it becomes less voodoo and more of a process of elimination. We’ll also talk about some other ways to create motion, from solenoids and linear motors to emerging technologies like muscle wire. You can download the full chapter from this link.
Project 6-1: DIY motor
Project 6-1: DIY motor from Dustyn Roberts on Vimeo.
A few more photos… click the picture to get to the whole flickr set
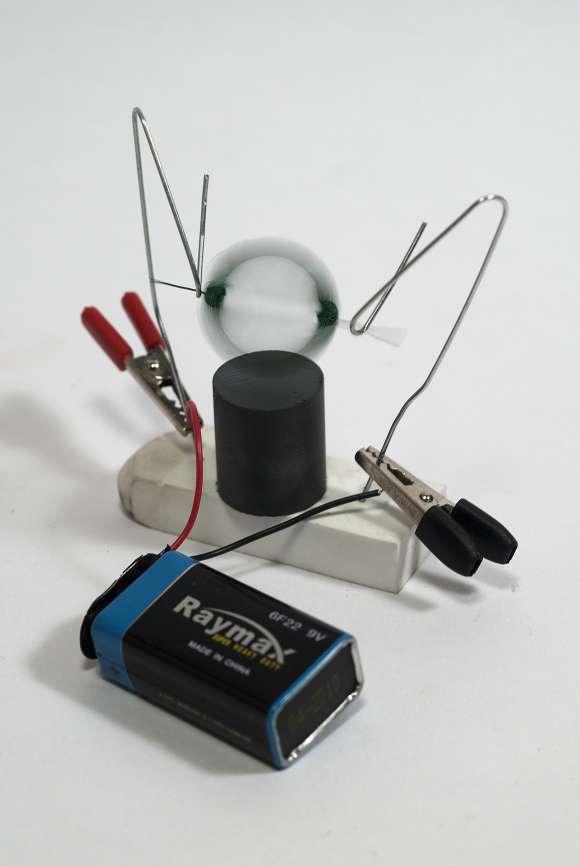
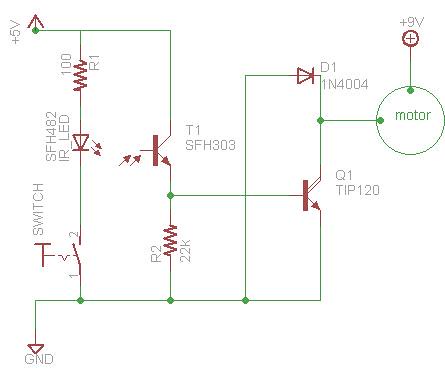
Project 6-2: DC Motor Control 101 – The simplest circuit
Project 6-2: DC Motor Control 101 – The simplest circuit from Dustyn Roberts on Vimeo
Project 6-3: Solder that Circuit
Project 6-4: Breadboard that Circuit
Project 6-5: Motor About-Face (controlling direction using an h-bridge)
See also ITP’s H-bridge lab
Project 6-6: Using hardware PWM to control speed
Project 6-7: Using software PWM to control speed
Project 6-8: Control a Standard Hobby Servo
Project 6-9: Controlling a bipolar stepper with Sparkfun’s Easy Driver
Chapter 7 – The Guts: Bearings, Couplers, and Gears
This chapter covers the guts of mechanisms, from gears to bearings, shafts, couplers, and more. One of the biggest problems my students have when working with motors is figuring out how to attach something to the shaft. We’ll cover this and much more as I step through the guts of mechanisms and show you how to choose and purchase components.
Project 7-1: Make your own gears
This project is posted as an excerpt on Make Magazine’s blog: How-to: Make your own gears. It also got picked up by Ponoko, Hackaday, adafruit industries, and How-to blogs. Some of the comments are great, including one from the Inkscape programmer who actually wrote the code that generates the gears!
Chapter 8 – Combining Simple Machines for Work and Fun
For hundreds of years, engineers and designers have been coming up with ways to convert rotary motion into useful work. A water wheel in a river can run a grain crusher, and the rotary motion from an electric motor can be used to drive the linear motion of a press. This happens through systems of cams and followers, cranks, and linkages. All complicated machines, mechanisms, and robots, are made up of a combination of simple machines. They help us convert rotary motion – the most common input motion – into linear, or up and down, output motion.
Automatons and mechanical toys have become favorite topics of many students in my class. Mechanical toys have been around for hundreds of years, and are some of the earliest examples of kinetic design. Often, a person would crank a handle, which wound a spring, then the stored energy would go about powering the toy. These toys were sometimes incredibly complex combinations of cams, linkages, springs, and components that often came in the form of dolls. These dolls could write poems or play the flute, based all on the interactions of mechanical parts with no electronics, sensors, or feedback at all. There are also some modern examples, from the work of Arthur Ganson to the toys made by Cabaret Mechanical Theatre and the paper machines from Flying Pig.
Project 8-1: Drawing Machine
Project 8-2: The Agreeable (Party) Sheep
Chapter 9
Materials and general fastening techniques were covered in an earlier chapter, but here we go over how to actually make something, or get someone else (or a machine) to make it for you. This starts with a design, whether it’s a napkin sketch or a full 3D CAD assembly. From there, some projects will be made by hand by sawing aluminum extrusions or using off the shelf components. Others will lend themselves to rapid prototyping, including 3D printing and laser cutting. Free and cheap software for design will be covered as well to speed up the design process. It also helps to have the method of fabrication in mind when initially designing the product, an idea called “design for manufacture” by the pros.
Project 9-1: Download part CAD model from McMaster into Alibre Design
Project 9-2: Drill a centered hole without a lathe
Chapter 10 – Projects
Project 10-1: Not Lazy Susan
This project took 3rd place in the Gadget Freak Design Contest! It was also later featured in the Gadget Freak section of Design News online.
Download the FREE file to laser cut the table top here on Thingiverse or buy one from my Ponoko store. You’ll also need a shaft adapter to sandwich the rotary table to the top of the box and fit onto the motor. You can download that file for FREE here on Thingiverse to make yourself if you have access to a 3D printer, or buy one from my Shapeways store.
If you would prefer to follow a schematic while reading through the instructions in the chapter, here you go:
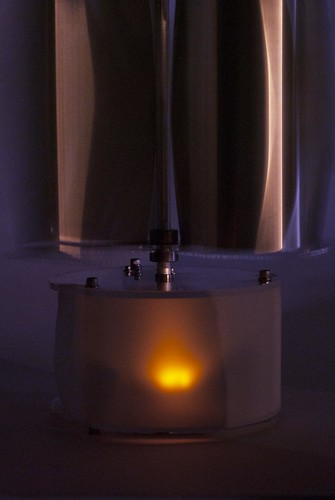
Project 10-2: Wind Lantern
See the Instructable on this project for full documentation! You can download the FREE template for the laser cut parts here on Thingiverse, or go ahead and buy them from my Ponoko showroom. Click on the image or video below to be taken to the full flickr set. Since I posted the Instructable, the project was featured in an episode of Make: Live, uploaded to Make: Projects, and picked up by Hackaday!
Project 10-3: SADbot – the Seasonally Affected Drawing robot
See the Instructable on this project for full documentation!
SADbot has already been listed as one of The 10 Robots That Rocked in 2010 and one of The 10 Coolest Kickstarter Projects of 2010. SADbot also got some love from Adafruit Industries, IEEE Spectrum, True/Slant, Robot Living, and gizmowatch. And when Ben and I showed it at Maker Faire NY in September 2010, our booth won a blue Editor’s Choice ribbon!